Friday, March 28, 2008

Crafting on the cheap part 1:jewelry

One of the main reasons why I decided to buy handmade and make handmade as well was that in high school. If I had went out to the mall or any other hip store and bought a necklace or earrings. The meanest girl in my school would have the same pair on the next day. Not to forget at my junior prom I had spent a $100 on this Gothic style dress only to show up and see another girl with the same dress.
So I took action and started putting together jewelry with my own personal touch to it. My Mom at the time had started making her own jewelry to go with clothing she would wear to work. From my Mom I had learned the basic steps and tips of jewelry making. Which I must share with everyone who reads this blog.

Tips for tools:
Now don't be that person who is stuck in the jewelry section of your craft store wondering where the hell to begin. Then out of nowhere when trying to find tools but become shocked at the price.

You will only need two tools to help you in making whatever you want without having to face the craft store.
All you have to do is go to your local hardware store.

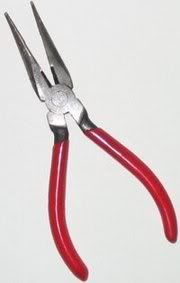
Needle nose pliers come in many sizes and help with moving and bending wire as well as open and close jump rings.


Wire cutters these work well with removing extra wire or metal from your project.


The only tool I suggest you buy from the craft store is a clasp crimp when you want to make necklaces.


www.manabeads.com shows a easy tutorial on how to close the ends of your necklace.

Supplies:
When it comes to supplies there are many resources for finding supplies. If you plan on just making projects for yourself and others as gifts and what not.
Then the craft store sells different types of findings and in small amounts.

Now if you plan on opening an online store or produce a large amount. Then the best suppliers is ebay.com or etsy.com. Along with many other websites depending on amount and shipping. You'll get a bang for your buck.

Sunday, March 23, 2008

Shrinky dink jewelry tips!

As a kid you were given shrinky dinks to over come your boredom when it came to bad weather and not being able to get outside of the house.
Well now you can go back to being a kid again with this fun project.

Now lets learn how to make some shrinky dink jewelry.

Before you go out and buy anything you most know there are three different kinds of paper.
1.Regular white
2.Frosted
3.Printable

They are all 8" by 10" sized sheets.The frosted and regular white come with ten sheets. Only the printable comes with six sheets(so use wisely).
Its better to get them at the craft store then to order online.
They are most likely in the scrapbook or children's craft section.

Printable is the easy way to make shrinky dinks but there is a catch when putting it in the printer. You have to make sure that the rough side is facing the area its going to be printed on. It is not printed on the rough side it will come out very runny and will smudge.

Frosted works best when traced or drawn on and give the dink a stain glass look to it.It also makes really cool Christmas ornaments. Just like the printable paper it also works best on the rough side. It works on both sides of the paper as well.

Regular white is easy to trace but you have to let it dry for a few seconds so it does not run or smudge.

Materials you will need:
Jump rings

Hole puncher

Different colored sharpies


Once you have designed your shrinky you will need to punch a hole with you hole puncher. Then you will need to cut out the shape of the shrinky and get ready for baking time.

Now you can use both your regular oven or toaster oven but trust me its easy and simply to just use your toaster oven. Pre-heat your oven from 275*-300* F(which won't take long for the toaster oven).

Now the steps call for a cut rectangle shape from a brown grocery bag but I have done this many time with the grocery bag and all my shrinkys come out stuck to the bag or when I peel them off the paper rips off and gets stuck to the back.
Here is an alternative to the paper bag.
The pan that fits inside the toaster oven works find but don't put the shrinkys on it just yet. Take a rectangle shape of aluminum foil and smooth it over the pan so it is nice and flat.

Then once you have everything ready place your shrinkys in the oven.
Once again it says you can leave it in for 3-5 minutes but I don't suggest it.
Just keep an eye on it but don't freak out at the wonder of its shrinking.

It will uncurl its self and lay flat in just a few seconds.
Now if it appears that one side of the shrinky does not go down flat.
WITHOUT Burning yourself push down so it lays flat.

Turn off your oven and everything cool off for a few minutes.
Once they have cooled down take your jump ring and place through the area you hole punched. Close it with a pair of needle nose pliers and there you have it.
Shrinky dink jewelry for earrings,necklaces and what not.

Thank you
Krista Moreno

Wednesday, March 12, 2008

I popped my etsy cherry FINALLY!

It took me FOREVER to finally sell something on etsy.
But one girl decided to go ahead and buy a pair of 80s heart earrings.
Which I am glad she did but I need to jump on the ball and get my promotional pictures done to have something printed to put in the mail.

My Lezbot the pinkdot inspired work


One of the vendors that I like the most is called Lezbot the pinkdot(Lezbot the Pinkdot on myspace.So I added my own little twist after finding my Grandmother's old washing machine owner's manuals.

Hello and Welcome!

I decide to keep my crafts in a blog to itself. Since everything looks like a big mess when you look through my myspace blog or livejournal. I believe I bore my non-crafty friends with my ramblings about yarn and what 1970s knitting design I make fun of. This will be the blog that I document my work on the DIY factory,Alamo City Knitting Society and promoting Martini MaMa as well.

But I get to focus on the road trips I take for Stitch and Lone star round up along with other craft fairs I go to. Covering my tabling at local shows and events(First Friday and South Tex Showdown) as well.

So please enjoy my endless bitchy rants on the craft world.

-Krista Moreno